Joomla is a content management system (CMS) that supports maintaining a website through a browser interface. It is a free tool and is well-documented on their website.
Joomla offers a good balance of power versus ease-of-use. Users with the proper permissions and little technical knowledge can add and update the website's content. Setting up and administering a website with Joomla requires a fair amount of technical skill.
There are two views of the joomla system:
- user: http://www.example.com (front-end)
- admin: http://www.example.com/administrator (back-end)
Content can be updated through either view. When logged into the front-end, pencil icons show up beside the items the user has permission to edit. Content is added and arranged through the back-end. Unless making a small change to existing content, use the admin interface to manage the website.
Note any changes to the website through the front-end or back-end will be visible immediately on the website.
Publishing in Joomla
Web content in Joomla is managed through articles and components. Articles are the news stories and informational web pages that make up the site. Components provide the more complex features like calendars and photo galleries. Joomla menu items point to the articles and components that make up the website to make them accessible. So, to make new content accessible on the site, the basic process is to create an article or component and then create a menu item to point to it.
The other aspects of the website that wrap around the main content are called modules. Menus (whether on the top or side) are managed as modules, as are the call-out boxes for things like upcoming events, facebook activity, important links, login boxes, etc. Modules are typically assigned a location (like right or left) and an order to control where they appear.
Articles appear on the web site in two forms: individual pages and blog-style like on the News page. Articles show up on the News page when they are assigned to the News section. Individual pages of the site are assigned to sections and categories that correspond to where they show up on the site. They could be left uncategorized (Section set to uncategorized), but categorizing them makes them easier to manage.
Articles are created and managed through the article manager in the (back-end) admin interface. To create or update an article, log into the admin interface and click Content > Article Manager. Click on an existing article to update it. To create a new article, click New at the top right.
Creating a New Page
To create a new page on the site, create a new article and then create a new menu item that points to the article. The steps are:
- Log into admin back-end
- Click Content > Article Manager
- Click New in the upper right
- Give the Article a Title
- Specify an Alias or leave it blank to have it filled automatically.
- Select a section and category for the article
- Enter the article content (see section Formating Articles)
- Save the article

- Click Menu > Main Menu
- Click New in the upper right
- Specify the Menu Item Type as: Articles > Article > Article Layout
- Enter the Name of the Menu Item
- Set the Parent Item to specify where the article should be published in the menu
- Set Published to "No"
- On the right side, click Select and select the new article
- Click Save to save the new menu item and return to the Main Menu Manager.

- When a new menu item is created, it is added at the end of the parent menu item. To change its location, find it in the Main Menu Manager and move it by
- clicking the arrows
- changing the Order numbers and clicking the disk icon beside the Order column header
- Finally, click the red X icon in the Published column to publish the menu item

The new menu item should now show up in the appropriate place on the live website.
Creating a News Article
News articles are published on the News Pages and also typically published on the front page. The process for publishing News articles does not include creating a menu item, but it does include a couple of other unique steps to place it on the front page. When an item it added to the front page, it is placed at the very top of the page by default. This may not be the desired location. The process to place the new article in a specific location on the front page is as follows:
- Create an article as described above, but with the following settings
- Section: News
- Category: <choose an appropriate category>
- Published: No
- Front Page: Yes
- Include a "Read More" break as described in the section below if the articles is over 10 to 12 lines long
- In the Front Page manager move the new article to the desired position
- Click Content > Front Page Manager
- Click the arrows in the Order column to arrange the articles
- Publish the new article
- Click the red X in the Published column
- Verify the Front Page is displayed correctly
- A common mistake is to forget to add a "Read more" break as described below. Often if one is not added the article will fill up the whole front page.
"Read more" breaks
Because news articles go on the front page, if they are longer than 10 or 12 lines of text then they should include a "Read more" break. Everything above the "Read more" break will show up on the front page with a "Read more" link on the bottom that leads to the full story. Insert a "Read more" break with the button on the bottom of the article editor area.
Formatting Articles
Joomla is finicky about formatting text. It is best to keep formatting simple and apply all formatting in the Joomla editor. Pasting text out of Word or some other sort of editor is likely to create a mess. If you are copying text from another document, it is best to remove all formatting before pasting into Joomla. This can be done two ways. The first approach is to the paste the content into a text editor, then copy it and paste the plain text into Joomla. Another approach is to paste directly into Joomla, then select all the pasted content and click the eraser button on the toolbar. It is the last icon on the second row.
When formatting content, try to stick to using the Format dropdown at the end of the first line on the toolbar. Regular text should be formatted as "Paragraph". For headings typically stick to Heading 3 and Heading 4 as used in this article. Ordered, bullets, unordered bullets, and indention (of bullets) are also recommended. These formats are also used throughout this tutorial.
Linking to Files for Download
When you are creating an article on the site, it is often desirable to make things like fliers, forms or other files available to users. The article editor fully supports this. It is accomplished by uploading the file to the website and then creating a link for downloading the file.
Note: To find out what an icon on a toolbar does, hover your mouse over the icon for a few seconds and typically a tool tip will displayed.
The first step is to type in the text for the link that you want users to click to download the file. For example, if uploading a PDF flyer for Volleyball, type something like "Volleyball Flyer (PDF)" into the editor.
Then select (highlight) the link text and click the link icon on the editor toolbar. It looks like the link in a chain.

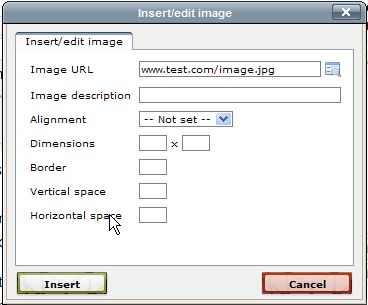
A dialog box is displayed for entering the link. For example to create a link to google.com, enter "www.google.com" into the link url. In order to point the link to the Volleyball flyer, the flyer must be made accessible by uploading it to the website.
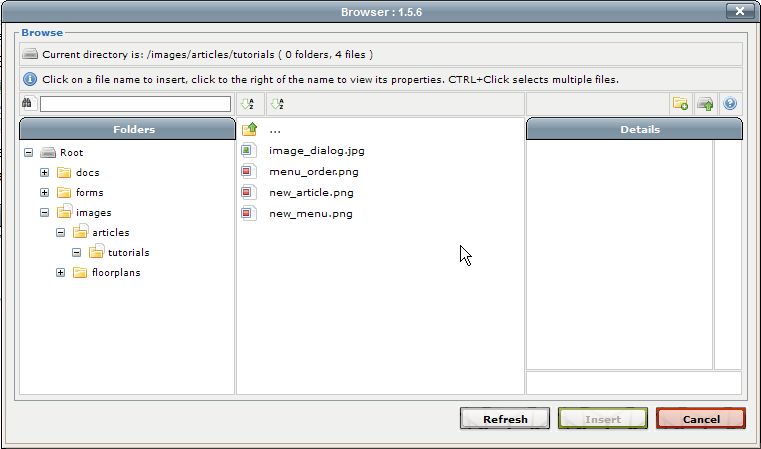
To enter a link to an existing file or to upload a new file, click the "Browse" icon to the right of the area for entering the Link URL. Clicking the "Browse" button opens the file browser for the website. The file browser shows directories on the web server for storing files.

Upload files into nested directory structure to keep the file storage area tidy. Use descriptive file names so it is fairly obvious what each file is.
Click on the directories to navigate to the proper location for uploading a file and create new directories as necessary with the "New Folder" icon on the toolbar to the right.
If the file was already uploaded, you can simply select the file and click the "Insert" button.
To start uploading a file, make sure the "Current Directory" at the top of the browser shows the proper location. Next, click the "Upload" icon on the toolbar next to the "New Folder" icon.
![]()
In the upload dialog, click the "Add" button, select the file to upload, and click "Open" button.

Multiple files can be uploaded at one time by using the steps above to select all the files. Once all the files are selected for uploading, click the "Upload" button to move the files to the website. Wait for all the icons next to the files to turn green which means they are finished uploading. Finally, click the "Cancel" button to close the Upload dialog.
Select the newly uploaded file in the Browser by clicking it.

To insert a link the newly uploaded file, click the "Insert" button to return to the Article editor.
The article now includes a link to the selected file. Save the article and test it by clicking the new link and ensuring the proper file is downloaded. To edit the link, return to the article editor, click the link, and the click the "Link" icon on the toolbar to modify the link.
Inserting Images
Images are inserted by pointing to an image on the website or some other website. Therefore if it is a new image, it must be uploaded prior to being inserted into an article. Joomla provides an integrated image uploader.
To insert an image, click the toolbar button that looks like a picture of a tree. The location of existing images can be pasted into the Image URL field.
Otherwise, to upload an image or browse for an existing one, click the icon to the right of the Image URL. It shows the media browser that supports:
- browsing and selecting files on the server
- creating new directories (icon above details)
- uploading new files (icon above details)
Follow the same process as uploading document files to upload and select the images.
Hiding Content on a Page
To hide part of a page, wrap it with { reg} content { /reg} tags with no spaces. The wrapped content will only be visible to registered users. I recommend putting the tags on their own lines like:
{ reg}
This stuff is hidden
{ /reg}
Use the eraser toolbutton to remove styling from the reg tags and don't include spaces in the tags. Spaces are used here so that the tags are visible.